
While working on a Flutter app, you may come across a requirement to show an image on full screen. Just like how Whatsapp, Instagram shows the images and videos on stories. The screen is fully covered by the background image and might have some text or other interactive UI elements on top of it. So in this tutorial, we’ll learn how to set Flutter background image.
Here’s what we’ll cover:
- Steps to Set Flutter Background Image in Container
- Setting Background Image in Full Screen
- Preventing Image Resize
Steps to Set Flutter Background Image in Container
To set background image in Flutter, you can use the Container widget. The Container widget has a property called decoration. Then you can use the BoxDecoration class to provide the actual image.
Before directly setting the background image in full screen, let’s see the basics of adding a background image.
Steps to set the flutter background image:
- Add the Container widget.
- Add the decoration parameter (inside Container) and assign the BoxDecoration class.
- Add the image parameter (inside BoxDecoration) and assign the DecorationImage class.
- Add the image parameter (inside DecorationImage) and assign the AssetImage(“YOUR-IMAGE-PATH”).
- Add the fit parameter (inside DecorationImage) and assign the BoxFit.cover.
- Run the App.
Example Code:
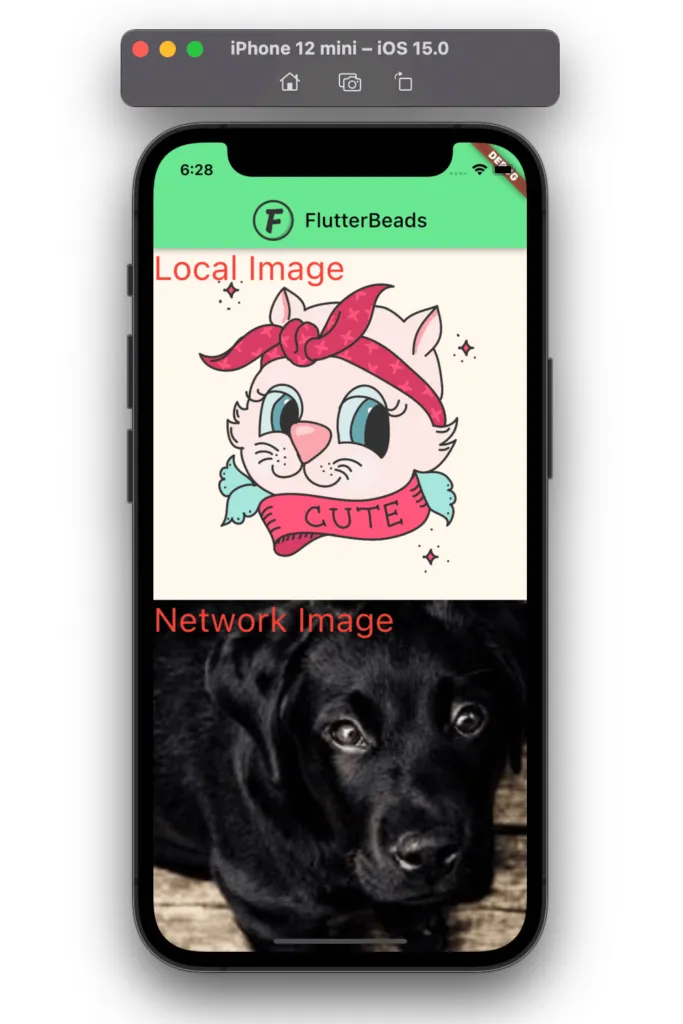
// 1. Local image
Container(
  height: 200,
  width: double.infinity,
  decoration: const BoxDecoration(
    image: DecorationImage(
        image: AssetImage("assets/images/cat2.jpg"),
        fit: BoxFit.cover),
  ),
  child: // Foreground widget here
)
// 2. Image from Internet
Container(
  height: 200,
  width: double.infinity,
  decoration: const BoxDecoration(
    image: DecorationImage(
        image: NetworkImage("https://picsum.photos/id/237/200/300"),
        fit: BoxFit.cover),
  ),
  child: // Foreground widget here
)
In the code above,
- Inside the AssetImage, Replace assets/images/cat2.jpg with your own image path.
- Inside the NetworkImage, Replace the https://picsum.photos/id/237/200/300 with your own image URL.
Output:
While adding background images to your Flutter app is easy, sometimes you may encounter an issue with loading assets. If you’re facing this problem, we recommend checking out our other blog post titled “Unable to Load Asset in Flutter“. It’s a comprehensive guide that will help you resolve this issue quickly and get back to creating stunning apps.
Setting Background Image in Full Screen
To set the background image in a fullscreen, you can use simply set the background image to the container and expand it fully to take all the available space.
Here’s how you do that:
- Add the background image to the container as described here.
- Add the constraints parameter (inside Container) and assign the BoxConstraints.expand() to it.
- Run the app.
Example Code:
Container(
  constraints: BoxConstraints.expand(),
  decoration: const BoxDecoration(
    image: DecorationImage(
        image: AssetImage("assets/images/cat2.jpg"),
        fit: BoxFit.cover),
  ),
  child: const Text(
    'Image in fullscreen',
    style: TextStyle(fontSize: 34, color: Colors.red),
  ),
)
Output:

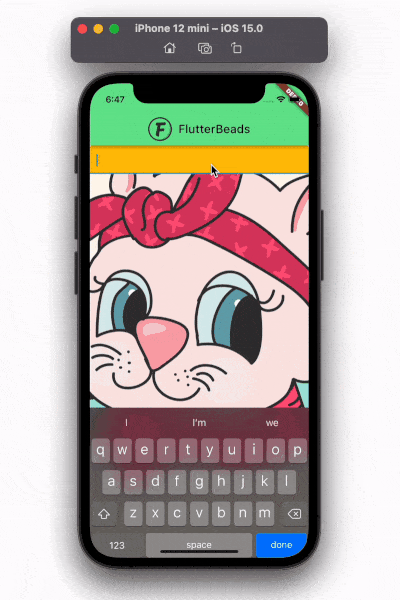
Preventing Image Resize
If you have a TextField widget over the background image, then opening a keyboard resizes the image. This doesn’t look good from the UX perspective.
Here’s the problem:

And here is how you solve the problem:
- Take the Container (having the background image) outside of the Scaffold widget.
- Set the backgroundColor of the Scaffold widget to Colors.transparent.
- Run the app.
Example Code:
@override
Widget build(BuildContext context) {
  return Container(
    constraints: const BoxConstraints.expand(),
    decoration: const BoxDecoration(
        image: DecorationImage(
            image: AssetImage("assets/images/cat2.jpg"), fit: BoxFit.cover)),
    child: Scaffold(
      backgroundColor: Colors.transparent,
      appBar: // Your app bar
      backgroundColor: const Color(0xff6ae792),
      ),
      body: Column(
        children: [
          const TextField(
              decoration:
                  InputDecoration(fillColor: Colors.amber, filled: true)),
        ],
      ),
    ),
  );
}
Output:
Thanks for reading!
Conclusion
In this tutorial, we saw how to set flutter background image in container with a practical example. We also learned, how to set the background image to full and prevent it from resizing when on-screen keyboard gets opened.
FAQs
How do I add a background image to a listview Flutter?
To add a background image to a ListView in Flutter, you can wrap the ListView widget in a Stack widget and add the background image as a child of the Stack. Here’s an example:
Stack(
  children: <Widget>[
    // Add the background image here
    Image.asset(
      'assets/images/background.png',
      fit: BoxFit.cover,
      width: double.infinity,
      height: double.infinity,
    ),
    // Wrap the ListView widget in a Positioned.fill widget to make it fill the entire screen
    Positioned.fill(
      child: ListView(
        children: <Widget>[
          // Add your list items here
          ListTile(
            title: Text('List Item 1'),
          ),
          ListTile(
            title: Text('List Item 2'),
          ),
          ListTile(
            title: Text('List Item 3'),
          ),
        ],
      ),
    ),
  ],
)
How do you fill an image in Flutter?
In Flutter, you can use the fit property of the Image widget to control how an image is fitted within its container. Here are the available fit options:
BoxFit.contain: Scale the image to fit within the container while preserving its aspect ratio. The image is centered within the container.BoxFit.cover: Scale the image to cover the entire container while preserving its aspect ratio. The image is centered within the container and cropped if necessary.BoxFit.fill: Scale the image to fill the entire container while distorting its aspect ratio.BoxFit.fitWidth: Scale the image to fit within the container width while preserving its aspect ratio. The height of the image may be smaller than the container height.BoxFit.fitHeight: Scale the image to fit within the container height while preserving its aspect ratio. The width of the image may be smaller than the container width.BoxFit.none: Center the image within the container without scaling.
Here’s an example of how to use the fit property to fill an image within a Container:
Container(
  width: 200,
  height: 200,
  decoration: BoxDecoration(
    image: DecorationImage(
      image: AssetImage('assets/images/image.png'),
      fit: BoxFit.cover,
    ),
  ),
),
How do I add an image to a row in Flutter?
To add image to a row in Flutter and make the child widgets appear on top of it, you can use a Stack widget. Here’s an example:
Stack(
  children: [
    Image(
      image: AssetImage('assets/images/image.png'),
      fit: BoxFit.cover,
    ),
    Row(
      children: [
        Text('Some text'),
        // add more child widgets here as needed
      ],
    ),
  ],
)
Would you like to check other interesting Flutter tutorials?
