
The Radio Button widget in Flutter is one of the most used widgets in building the Form. It is used to allow users to make a selection from the set of options. But sometimes you may want to change its default selected and unselected color. So in this tutorial, we’ll see how to change radio button color in Flutter for selected and unselected items
Here’s how it looks after changing color:
Here’s what we’ll cover:
- Steps to change radio button color in Flutter
- Changing radio button color globally
- How to change the radio button unselected color
- Changing radio button unselected color globally
Steps to change radio button color in Flutter
To change radio button color in Flutter, add fillColor property to the Radio widget. Inside the fillColor use the MaterialStateColor to add the color of your choice.
Here is the step by step instructions:
Step 1: Locate the file where you have placed the Radio widget.
Step 2: Inside the Radio widget, add the fillColor parameter and assign the MaterialStateColor.resolveWith((states) => Colors.green)
Step 3: Change the Colors.green with the color of your choice.
Step 4: Repeat the steps for the other Radio button (Inside the ListTile) as well.
Step 5: Run the app.
Code Example
ListTile(
title: const Text('Car'),
leading: Radio<Travel>(
value: Travel.car,
groupValue: _travel,
fillColor:
MaterialStateColor.resolveWith((states) => Colors.green), //<-- SEE HERE
onChanged: (Travel? value) {
setState(() {
_travel = value;
});
},
),
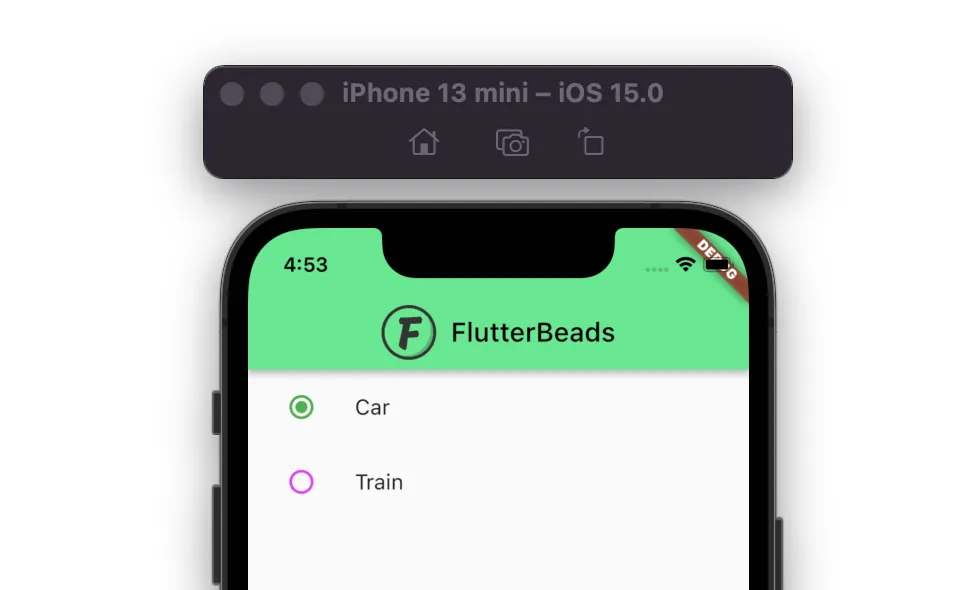
)Output
Also, see how to add color from hex. By using hex codes, you can easily create colors that match your brand or design vision.
Changing radio button color globally
To change the radio button color globally:
- Locate the
MaterialAppwidget. - Inside the MaterialApp, add the
themeparameter withThemeDataclass assigned. - Inside the
ThemeDataadd theradioThemeparameter and then assign theRadioThemeData. - Inside the
RadioThemeDataadd thefillColorparameter and assign theMaterialStateColor.resolveWith((states) => Colors.green) - Run the app.
Code Example
return MaterialApp(
  title: 'Flutter Demo',
  theme: ThemeData(
      primarySwatch: Colors.blue,
      radioTheme: RadioThemeData(
        fillColor: MaterialStateColor.resolveWith((states) => Colors.green), //<-- SEE HERE
      )
      ),
  home: ChangeRadioButtonColorDemo(),
);
How to change the radio button unselected color
In the previous section, we saw how to change the radio button color for the selected item. But sometimes you might be looking to change the color for the unselected item. In that case, you can use another property called unselectedWidgetColor.
Here’s is how you use it:
Step 1: Select the Column or Row inside which you have added the ListTile that further contains the Radio widget.
Step 2: Wrap that Column or Row inside the Theme widget.
Step 3: Inside the Theme widget, add the data property and then assign the ThemeData widget.
Step 4: Inside ThemeData widget and add the unselectedWidgetColor parameter and give it a color.
Step 5: Run the app.
Code Example
Theme(
data: ThemeData(unselectedWidgetColor: Colors.purpleAccent), //<-- SEE HERE
child: Column(
children: <Widget>[
ListTile(
title: const Text('Car'),
leading: Radio<Travel>(
value: Travel.car,
groupValue: _travel,
fillColor:
MaterialStateColor.resolveWith((states) => Colors.green),
onChanged: (Travel? value) {
setState(() {
_travel = value;
});
},
),
),
ListTile(
title: const Text('Train'),
leading: Radio<Travel>(
value: Travel.train,
groupValue: _travel,
fillColor:
MaterialStateColor.resolveWith((states) => Colors.green),
onChanged: (Travel? value) {
setState(() {
_travel = value;
});
},
),
),
],
),
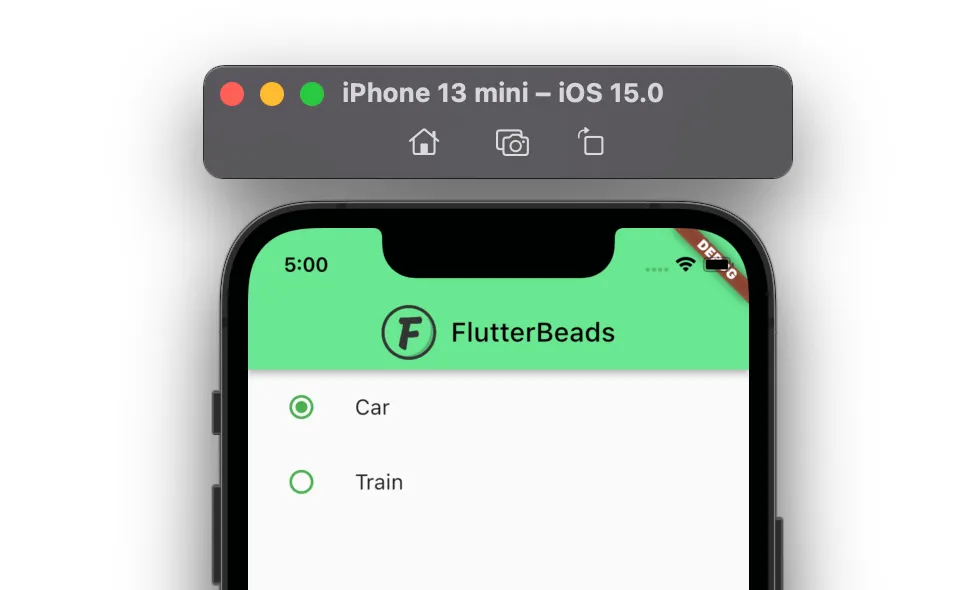
)Output
Changing radio button unselected color globally
To change the radio button unselected color globally:
- Locate the
MaterialAppwidget. - Inside the MaterialApp, add the
themeparameter withThemeDataclass assigned. - Inside the
ThemeDataadd theunselectedWidgetColorparameter and give it a color. - Run the app.
Code Example
return MaterialApp(
  title: 'Flutter Demo',
  theme: ThemeData(
      primarySwatch: Colors.blue,
      unselectedWidgetColor: Colors.purpleAccent, //<-- SEE HERE
      ),
  home: ChangeRadioButtonColorDemo(),
);
Conclusion
In this tutorial, we learned how to change radio button color in Flutter with practical examples, we first saw how to change the color for the selected item and later explored how to change the color for unselected items. We also went through the steps to change the color at the app level.
Would you like to check other interesting Flutter tutorials?
