
While building a form, you may want users to select a value from multiple options. There can be many ways to build such a user interaction. One of the widely used UI elements to address this requirement is using the dropdown. So this tutorial, we’ll learn an easy way to create a Flutter dropdown using the Dropdown Button and Dropdown Menu Item widgets with example code.
Here’s how it looks:

Here’s what we’ll cover:
What is Dropdown
In Flutter, A DropDown allows users to select a single item from multiple options. It shows the currently selected item and opens up a list of options when you tap on it.
How to Create a Flutter dropdown
In Flutter, a dropdown is created using the DropdownButton and DropdownMenuItem widgets. The DropdownButton takes the list of items and shows them using the DropdownMenuItem.
To add or create dropdown in flutter:
- Add a variable called dropdownValue that holds the currently selected item.
- Add the DropdownButton widget to your page.
- Inside the DropdownButton, add the value parameter and assign the dropdownValue that we created in step 1.
- Inside the DropdownButton, add the items parameter and prepare the list of DropdownMenuItem.
- Inside the DropdownButton, add the onChanged parameter and add a function that sets the newly selected value to the dropdownValue (we previously added).
Code Example:
// Step 1.
String dropdownValue = 'Dog';
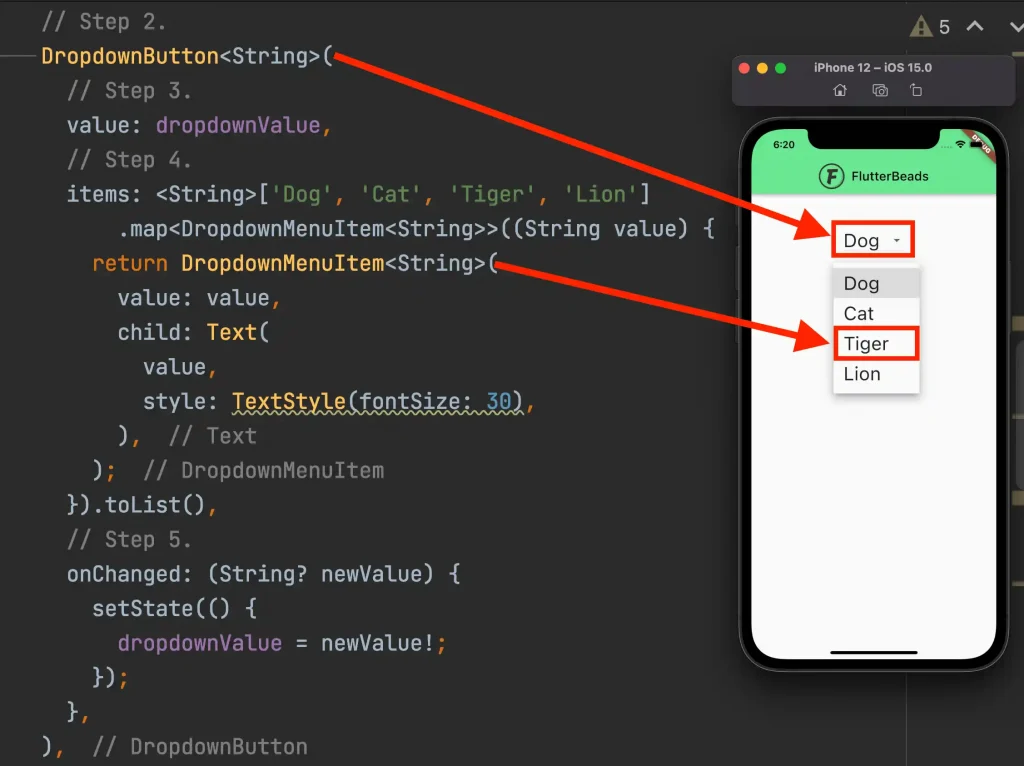
// Step 2.
DropdownButton<String>(
// Step 3.
value: dropdownValue,
// Step 4.
items: <String>['Dog', 'Cat', 'Tiger', 'Lion']
.map<DropdownMenuItem<String>>((String value) {
return DropdownMenuItem<String>(
value: value,
child: Text(
value,
style: TextStyle(fontSize: 30),
),
);
}).toList(),
// Step 5.
onChanged: (String? newValue) {
setState(() {
dropdownValue = newValue!;
});
},
),Output:
How to get value from dropdown in Flutter
If you followed all the steps in a previous section of how to create the dropdown, then getting the value is now much easier. The newly selected value is stored inside the variable called dropdownValue and you can use this variable wherever you want.
To get value from dropdown in Flutter:
- Create a dropdown as described in the previous section.
- Add the Text widget and show the currently selected item using the variable called dropdownValue.
Code Example:
Text(
  'Selected Value: $dropdownValue', // <-- SEE HERE
  style: TextStyle(fontSize: 30, fontWeight: FontWeight.bold),
)
Output:

Here’s the full code:
import 'package:flutter/foundation.dart';
import 'package:flutter/material.dart';
class DropdownDemo extends StatefulWidget {
  const DropdownDemo({Key? key}) : super(key: key);
  @override
  State<DropdownDemo> createState() => _DropdownDemoState();
}
class _DropdownDemoState extends State<DropdownDemo> {
  String dropdownValue = 'Dog';
  @override
  Widget build(BuildContext context) {
    return Scaffold(
      appBar: ...,
      body: Center(
        child: Column(
          children: [
            SizedBox(
              height: 50,
            ),
            // Step 2.
            DropdownButton<String>(
              // Step 3.
              value: dropdownValue,
              // Step 4.
              items: <String>['Dog', 'Cat', 'Tiger', 'Lion']
                  .map<DropdownMenuItem<String>>((String value) {
                return DropdownMenuItem<String>(
                  value: value,
                  child: Text(
                    value,
                    style: TextStyle(fontSize: 30),
                  ),
                );
              }).toList(),
              // Step 5.
              onChanged: (String? newValue) {
                setState(() {
                  dropdownValue = newValue!;
                });
              },
            ),
            SizedBox(
              height: 20,
            ),
            Text(
              'Selected Value: $dropdownValue',
              style: TextStyle(fontSize: 30, fontWeight: FontWeight.bold),
            )
          ],
        ),
      ),
    );
  }
}
Conclusion
In this tutorial, we learned how to create Flutter dropdown using the Dropdown Button and Dropdown Menu Item widgets with example code. We first saw what is dropdown and explored how to get a value of a dropdown. Just in case you missed any steps, we have attached the full code of the dropdown. Hope you liked it.
FAQs
How to add dropdown in textfield in Flutter?
To add a Dropdown widget inside a TextField in Flutter, you can use the InputDecorator widget. Here’s an example code:
TextField(
   decoration: InputDecoration(
      labelText: 'Select an item',
      border: OutlineInputBorder(),
      suffixIcon: DropdownButtonFormField(
         value: selectedValue,
         onChanged: (newValue) {
            setState(() {
               selectedValue = newValue;
            });
         },
         items: items.map<DropdownMenuItem<String>>((String value) {
            return DropdownMenuItem<String>(
               value: value,
               child: Text(value),
            );
         }).toList(),
      ),
   ),
)
How to call api on change of dropdown value in flutter?
To call an API on the change of a dropdown value in Flutter, you can use the DropdownButton widget and the onChanged property. First, define a variable to store the selected value from the dropdown. Then, wrap the DropdownButton widget with a StatefulWidget and set the onChanged property to a function that updates the selected value and calls the API with the selected value as a parameter. When the user selects a value from the dropdown, the function is triggered, and the API call is made with the new value. This allows you to dynamically update the content of your app based on the user’s selection in the dropdown.
Would you like to check other interesting Flutter tutorials?