
The Stack widget in Flutter allows you to overlap widgets. For example, you can use the Stack widget to develop a UI that shows a list of users’ profile pictures overlapping on top of the previous one. The Stack widget is one of the most important and widely used widgets. But sometimes you may want to control how the widgets are positioned. So in this tutorial, we’ll see the positioned Flutter widget in Stack: The top 3 ways and when how you can use them.

Here’s what we’ll cover:
The Problem
The problem is that when you add several children to the Stack widget, all the children are positioned in the top start (top-left for the LTR text settings) direction of the Stack widget.

You may want to change this default setting and have the widget’s position of your choice. That’s what we’ll see in the next section.
Flutter Position Widget in Stack : 3 Ways
In Flutter, to position widget in Stack, there are mainly three ways:
- Using Align Widget in Flutter
- Using Positioned Flutter Widget
- Using Stack’s Alignment Property
You can use any of the above based on your requirements.
1. Using Align Widget in Flutter
You can use the Align widget, to align a particular widget in a specific position. If you use the Align widget, your child widget will not follow the Stack’s alignment and then you can place the widget anywhere on the screen using the Align’s alignment property.
Here’s how you do it:
- Wrap the Stack’s child widget inside the
Alignwidget. - Inside the Align widget, add the
alignmentproperty and give it the alignment of your choice. For example,AlignmentDirectional.centerStart,AlignmentDirectional.topEndand so on. - Run the app.
Code Example:
Stack(
  children: [
    Align(
      alignment: AlignmentDirectional.topEnd, // <-- SEE HERE
      child: Container(
        width: 300,
        height: 300,
        color: Colors.redAccent,
      ),
    ),
    Container(
      width: 250,
      height: 250,
      color: Colors.amberAccent,
    ),
    Container(
      width: 230,
      height: 230,
      color: Colors.deepPurpleAccent,
    ),
  ],
)
When to Use:
You can use the Align widget when you want the widget not to follow the Stack’s alignment and position a widget as per the alignment specified in the Align widget.
Output:

2. Using Positioned Flutter Widget
Using the Positioned Flutter widget, you can place a widget at a custom position such as 10 pixels from left and 15 pixels from the top, instead of just topLeft, bottomCenter.
Here’s how you do it:
- Wrap the Stack’s child widget inside the
Positionedwidget. - Inside the Position widget, add the
top,right,bottom,leftproperty and give it a value. For example, setting top:15 and right:0 will position a widget on the top right of your screen with 15 px space from the top. - Run the app.
Code Example:
Stack(
children: [
Align(
alignment: AlignmentDirectional.topEnd,
child: Container(
width: 300,
height: 300,
color: Colors.redAccent,
),
),
Container(
width: 250,
height: 250,
color: Colors.amberAccent,
),
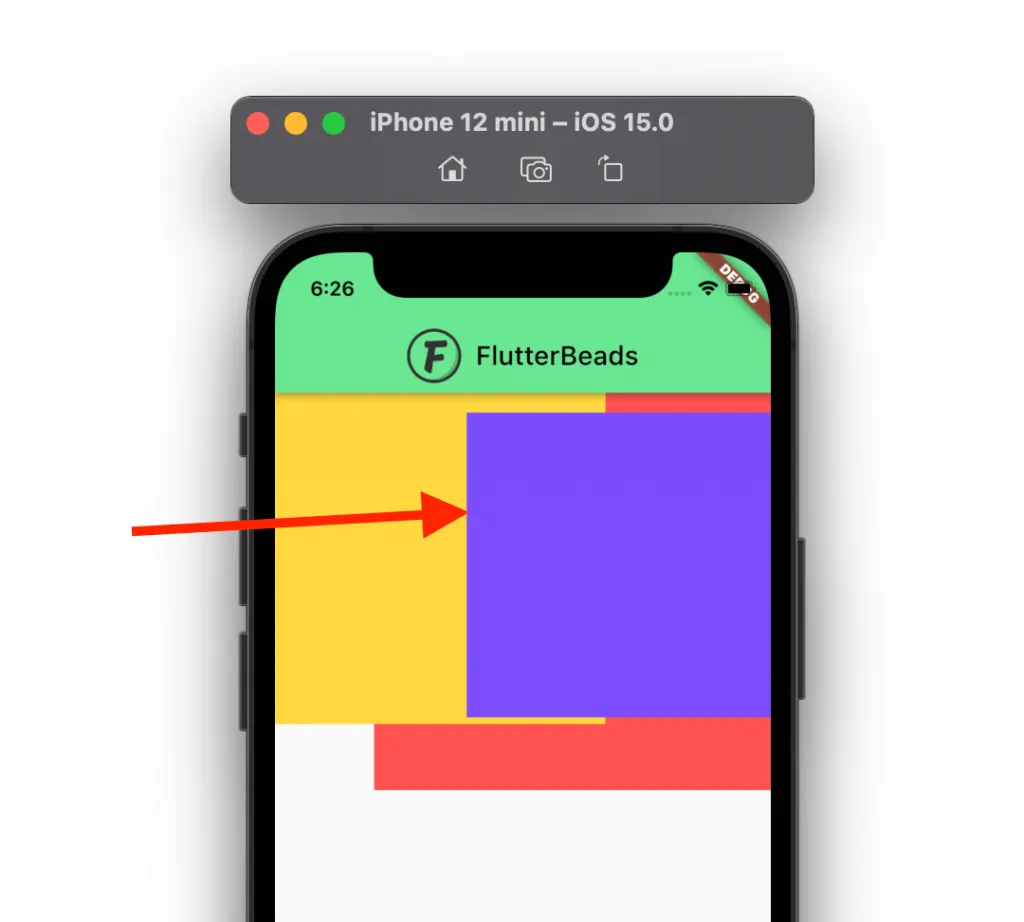
Positioned( //<-- SEE HERE
right: 0,
top: 15,
child: Container(
width: 230,
height: 230,
color: Colors.deepPurpleAccent,
),
),
],
)When to Use:
You should use the Positioned widget when you want to place any widget at a specific location on your screen.
Output:
3. Using Stack’s Alignment Property
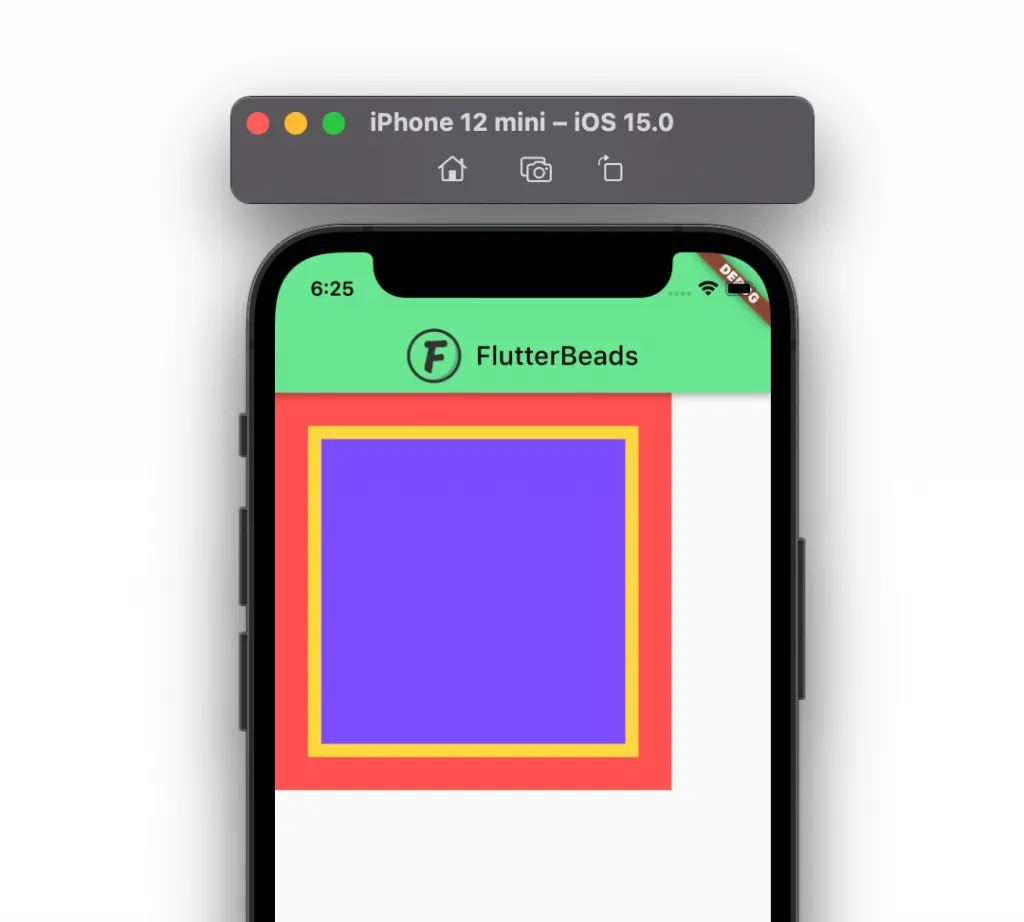
Using Stack’s alignment property, you can align all the widgets in one direction. For example, all widgets in the center, all widgets in the bottom right, and so on.
To position the widget in the Stack, simply add the alignment property and give it the alignment of your choice. For example, AlignmentDirectional.centerStart, AlignmentDirectional.topEnd and so on.
Code Example:
Stack(
  alignment: AlignmentDirectional.center,
  children: [
    Container(
      width: 300,
      height: 300,
      color: Colors.redAccent,
    ),
    Container(
      width: 250,
      height: 250,
      color: Colors.amberAccent,
    ),
    Container(
      width: 230,
      height: 230,
      color: Colors.deepPurpleAccent,
    ),
  ],
)
When to Use:
Use this property when you want to align ALL of your widgets in a specific direction.
Output:
Conclusion
In this tutorial, we learned the position flutter widget in Stack. We first saw the problem of having the default direction with the Stack widget and then saw how you can position a widget in Stack using Align, Position widget. We also explored the simplest way of positioning all the widgets in one direction using Stack’s alignment property.
FAQs
What does positioned do in Flutter?
In Flutter, Positioned is a widget that is used to position a child relative to its parent in a Stack. It allows you to specify the position of a child widget with respect to the top, right, bottom, or left edges of its parent widget. Positioned is particularly useful when you want to overlap multiple widgets on top of each other or when you want to position a widget at a specific location within its parent widget. By using the Positioned widget, you can create complex layouts and designs in Flutter with ease.
What is the difference between positioned and align in Flutter?
In Flutter, Positioned and Align are two widgets that allow you to position child widgets within their parent widget. However, there are some key differences between the two:
Positionedis used to position a child widget relative to a specific location within the parent widget. You need to provide theleft,right,top, andbottomparameters to specify the position.Positionedcan also be used to specify the width and height of the child widget.Align, on the other hand, is used to align a child widget within its parent widget, using thealignmentparameter. Thealignmentparameter can take values such astopLeft,center,bottomRight, etc.Aligncan also be used to specify the width and height of the child widget.
In short, Positioned is used for absolute positioning, while Align is used for relative positioning. If you need to position a child widget relative to a specific location in the parent widget, use Positioned. If you need to align a child widget within the parent widget, use Align.
Would you like to check other interesting Flutter tutorials?
