
While developing the Flutter app, sometimes you may need to add the underline to the Text widget. Adding an underline to the Text widget helps the text stand out from other text as it instantly grabs the user’s attention. There are many different ways to add the text underline but in this tutorial, we’ll see the best way to implement the Flutter text underline with practical examples.
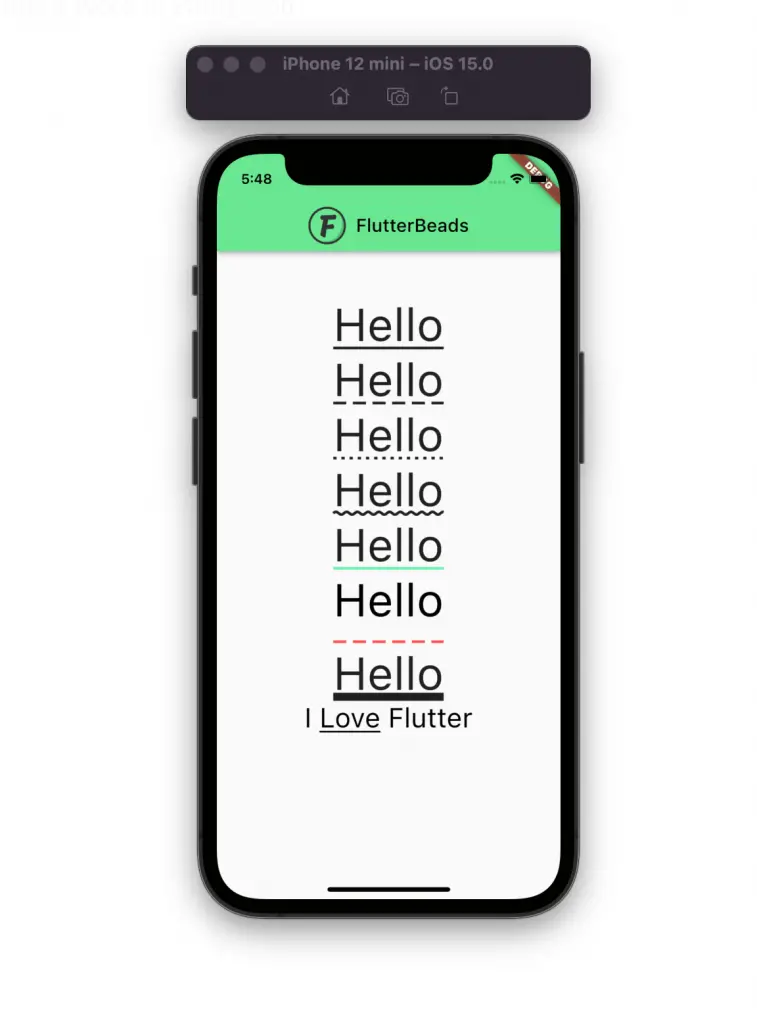
Here’s is what we are going to build:
Here’s what we’ll cover:
- Adding Flutter Text Underline
- Changing Text Underline Style
- Adding Text Underline Color
- Changing Text Underline Thickness or Height
- Adding Space between Text and Underline
- Underline a Word in Paragraph
Adding Flutter Text Underline
The Flutter text underline can be added by simply adding the TextDecoration.underline value to the decoration property of TextStyle.
Here’s how you do it:
Step 1: Inside the Text widget, add the style parameter and assign the TextStyle() class.
Step 2: Inside the TextStyle(), add the decoration parameter and assign the TextDecoration.underline value.
Code Example:
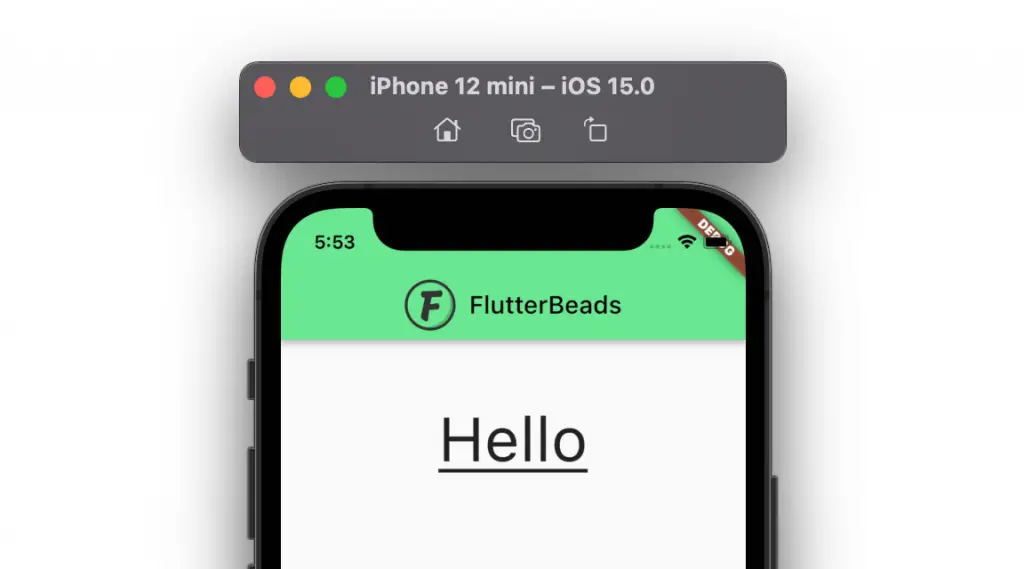
const Text(
  'Hello',
  style: TextStyle(
    fontSize: 50,
    decoration: TextDecoration.underline, // <-- SEE HERE
  ),
),
Output:
If you’re interested in further enhancing your text formatting skills in Flutter, be sure to also check out our post on ‘How to Wrap Text on Overflow‘ – it’s packed with useful tips and techniques to take your Flutter development to the next level!
Changing Text Underline Style
There are various styles you can set to text underline such as dotted underline, dashed underline, wave underline, and double underline.
Here’s how you do it:
Step 1: Inside the Text widget, add the style parameter and assign the TextStyle() class.
Step 2: Inside the TextStyle(), add the decoration parameter and assign the TextDecoration.underline value.
Step 3: Add one more parameter called decorationStyle and choose among the TextDecorationStyle.wavy, TextDecorationStyle.dotted, TextDecorationStyle.double and TextDecorationStyle.dashed.
Code Example:
Column(
children: [
const SizedBox(
height: 50,
),
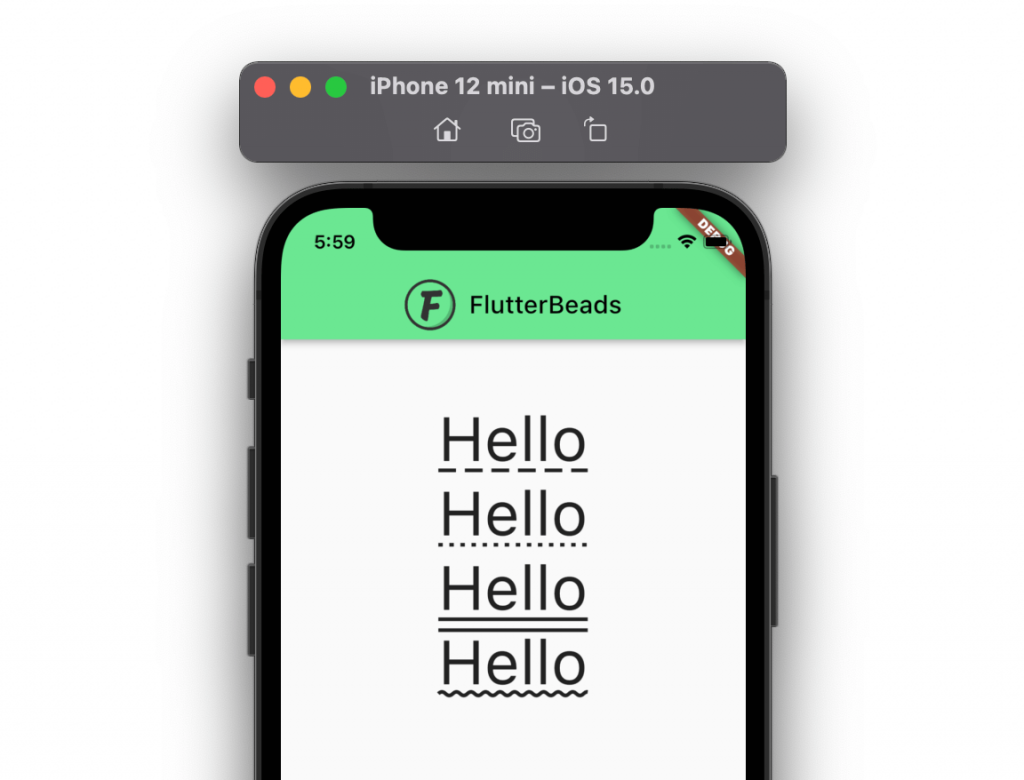
const Text(
'Hello',
style: TextStyle(
fontSize: 50,
decoration: TextDecoration.underline,
decorationStyle: TextDecorationStyle.dashed,
),
),
const Text(
'Hello',
style: TextStyle(
fontSize: 50,
decoration: TextDecoration.underline,
decorationStyle: TextDecorationStyle.dotted,
),
),
const Text(
'Hello',
style: TextStyle(
fontSize: 50,
decoration: TextDecoration.underline,
decorationStyle: TextDecorationStyle.double,
),
),
const Text(
'Hello',
style: TextStyle(
fontSize: 50,
decoration: TextDecoration.underline,
decorationStyle: TextDecorationStyle.wavy,
),
),
],
)Output:
Adding Text Underline Color
By default, the text underline appears in the color of the text. However, you can change the color of the underline using the decorationColor property.
Steps:
Step 1: Inside the TextStyle() class, first add the basic underline.
Step 2: Add that parameter called decorationColor and assign the color of your choice.
Code Example:
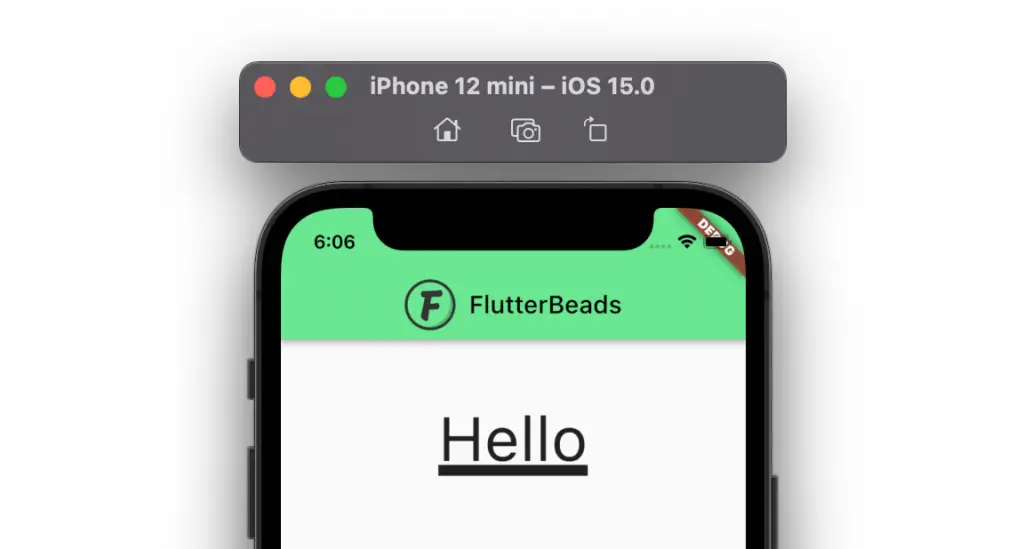
const Text(
  'Hello',
  style: TextStyle(
    fontSize: 50,
    decoration: TextDecoration.underline,
    decorationColor: Colors.greenAccent, // <-- SEE HERE
  ),
),
Output:

Changing Text Underline Thickness or Height
Sometimes you may not be satisfied with the default thickness or height of the underline. However using the decorationThickness property, you can customize the height or thickness of the underline to match your design.
Steps:
Step 1: Inside the TextStyle() class, first add the basic underline.
Step 2: Add that parameter called decorationThickness and assign the value such as 3, 5, 1.5, etc.
Code Example:
const Text(
  'Hello',
  style: TextStyle(
      fontSize: 50,
      decoration: TextDecoration.underline,
      decorationThickness: 3, //<-- SEE HERE
),
),
Output:
Adding Space between Text and Underline
Sometimes you may also need to add some space between the text and underline.
Here’s how you do it:
Step 1: Add basic underline as mentioned in the previous section.
Step 2: Set the Text color to transparent.
Step 3: Create the shadow of existing text and move it a little upwards (to create the space) and set its color to the original text color.
Code Example:
const Text(
  'Hello',
  style: TextStyle(
    fontSize: 50,
    color: Colors.transparent, // Step 2 SEE HERE
    shadows: [Shadow(offset: Offset(0, -20), color: Colors.black)], // Step 3 SEE HERE
    decoration: TextDecoration.underline,
    decorationStyle: TextDecorationStyle.dashed,
    decorationColor: Colors.redAccent,
  ),
),
Output:

Underline a Word in Paragraph
All the steps that we saw above can be used to underline a single text widget. But what about underling the specific text in a paragraph? Don’t worry. You can use the same fundamentals mentioned above with the addition of wrapping your text inside the TextSpan and RichText and widget.
If you are a visual learner you can check how the RichText widget works in below official video.https://www.flutterbeads.com/media/7f32eeef00ffe45c55ffc22fe1a9582b
Steps:
Step 1: Add the RichText widget.
Step 2: Add some TextSpan widgets inside.
Step 3: Identify the TextSpan widget that you would like to underline.
Step 4: Use the same method as described above to add an underline.
Code Example:
RichText(
  text: const TextSpan(
    style: TextStyle(fontSize: 30, color: Colors.black),
    children: [
      TextSpan(
        text: 'I ',
        style: TextStyle(fontSize: 30),
      ),
      TextSpan(
        text: 'Love',
        style: TextStyle(
            decoration: TextDecoration.underline, fontSize: 30), //<-- SEE HERE
      ),
      TextSpan(
        text: ' Flutter',
        style: TextStyle(fontSize: 30),
      ),
    ],
  ),
)
Output:

Conclusion
In this tutorial, we learned how to implement the Flutter text underline with practical examples. We first saw how you can add a basic underline to your Text widget and then explored some ways to customize it. Finally, we saw how you can underline a specific word in the paragraph with the help of the RichText widget.
Would you like to check other interesting Flutter tutorials?