
While developing your Flutter app, you may need to include a scrollable widget such as ListView/GridView inside the Column. But when you add such a scrollable widget inside the Column, you get some error message in your console. So in this tutorial, we’ll see how to add ListView inside Column in Flutter.
Here’s what we’ll cover:
What does Error look Like?
The error message depends upon the following two scenarios:
- ListView inside Column with Vertical Scroll Direction
- ListView inside Column with Horizontal Scroll Direction
1. ListView inside Column with Vertical Scroll Direction
When you try to add the ListView with a vertical scroll inside the Column, you get an error that looks like the below:
Error Message: Vertical viewport was given unbounded height.

2. ListView inside Column with Horizontal Scroll Direction
When you try to add the ListView with a horizontal scroll inside the Column, you get an error that looks like the below:
Error Message: Horizontal viewport was given unbounded height.

Why Did you Get the Error?
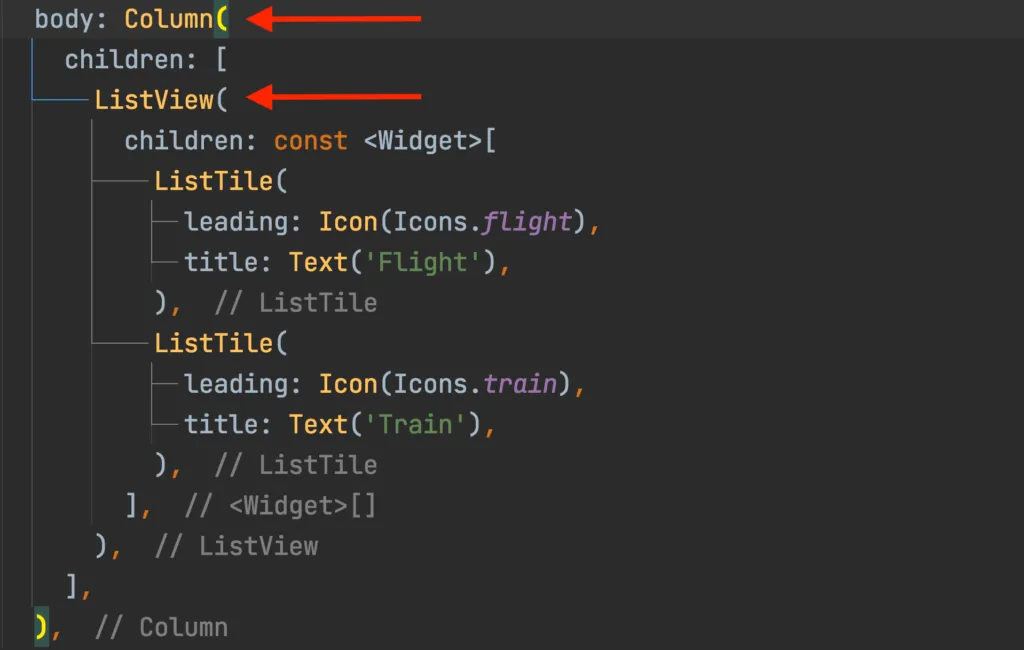
The reason for getting this error is because of adding the ListView inside the Column without giving proper constraint. By default, The ListView takes all the available space in a vertical direction and the Column widget doesn’t add any constraint on its children’s height. Hence it becomes difficult for the Flutter to calculate the size of the ListView.
TLDR: You added one ListView widget DIRECTLY inside the Column.
Ways to Add ListView inside Column in Flutter
To add the ListView inside Column in Flutter, there are mainly three ways:
- Using Expanded (Recommended)
- Using ShrinkWrap
- Using SizedBox
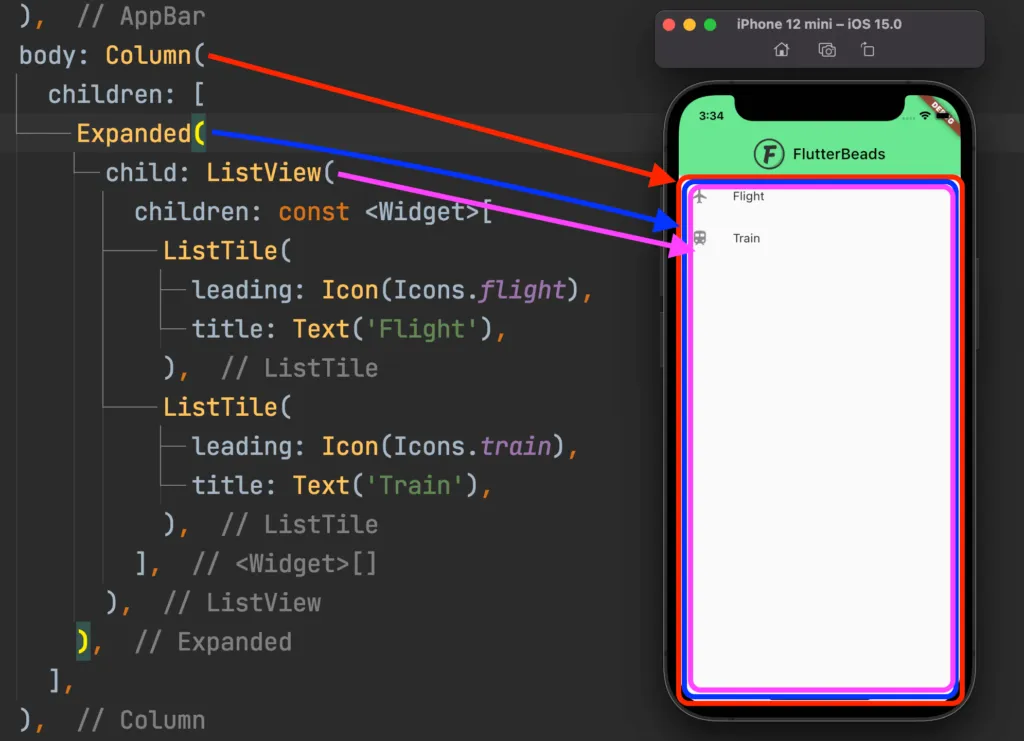
1. Using Expanded (Recommended)
You can wrap your ListView widget inside the Expanded widget and this will allow the ListView to take all the available as long as the Column allows.
Note: The main point here is to tell how much tall the ListView will be.
Code Example:
Column(
  children: [
    Expanded(
      child: ListView(
        children: const <Widget>[...],
      ),
    ),
  ],
)
Output:
2. Using shrinkWrap
Add the shrinkWrap property to the ListView and set it to True. This will make the ListView widget shrink down to its children’s size.
Code Example:
Column(
  children: [
    ListView(
      shrinkWrap: true,
      children: const <Widget>[...],
    ),
  ],
)
Output:

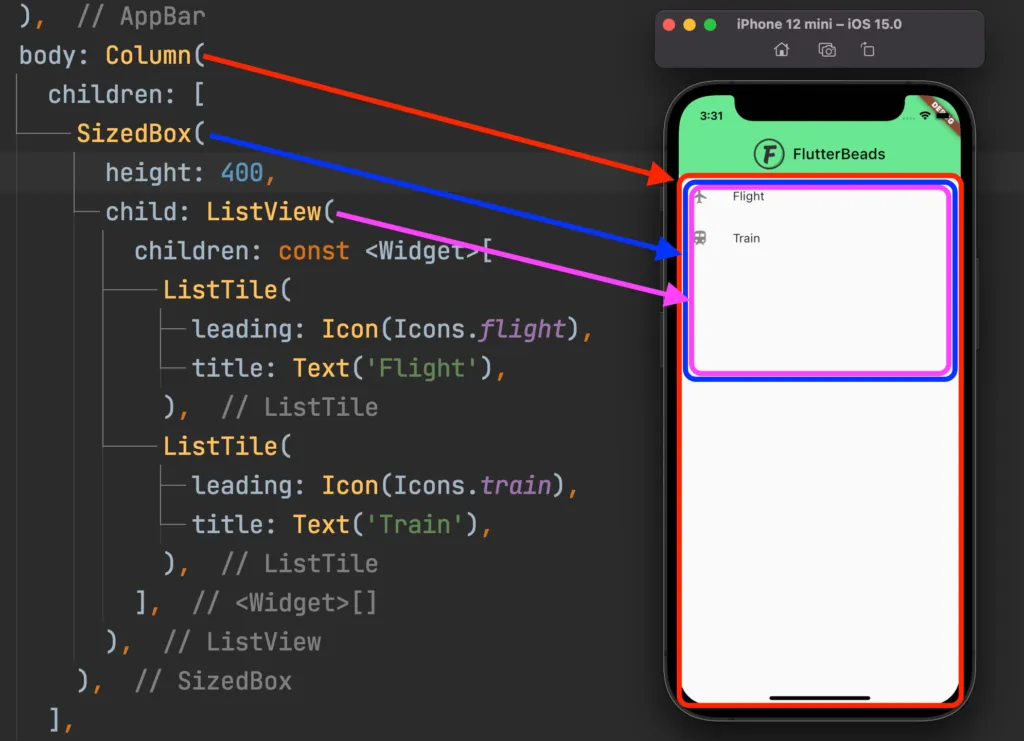
3. Using SizedBox
Wrapping your ListView inside the SizedBox widget will ensure that the ListView is displayed in a limited portion instead of infinite size.
Code Example:
Column(
  children: [
    SizedBox(
      height: 400,
      child: ListView(
        children: const <Widget>[...],
      ),
    ),
  ],
)
Output:
If you’re looking for another useful tip to enhance your Flutter UI, be sure to check out our blog post on ‘Add Space Between Column Widgets in Flutter‘. It’s a simple yet effective way to give your UI a cleaner and more organized look. Trust me, your users will appreciate it!
Conclusion
In this tutorial, we learned the top 3 ways to add the ListView inside Column in Flutter with practical examples. Basically, we can use the Widgets such as SizededBox or Expanded or simply the shrinkWrap property to include ListView inside Column. We also understood why did you get this error with a practical example.
FAQs
How to make listview builder scrollable in flutter?
To make listview builder scrollable in flutter:
- Wrap the
ListView.builderwidget inside aExpandedorFlexiblewidget to ensure that it takes up all the available space and allows scrolling. - Make sure that the
shrinkWrapproperty of theListView.builderwidget is set totrue. This ensures that the list only takes up as much space as needed and allows the parent widget to handle scrolling.
Would you like to check other interesting Flutter tutorials?
