
Adding external packages to your app can make things easier for you and allows you to focus on the mission-critical feature of your app. But sometimes when you add the packages, you may face an issue that asks you to increase the Android minSdkVersion. This happens because the plugin requires a higher android sdk version for projects that were created before and after Flutter 2.8 update. So in this tutorial, we’ll see how to change Android minSdkVersion (flutter.minsdkversion) in Flutter.
Here’s what we’ll cover:
Ways to Change Android minSdkVersion (flutter.minsdkversion) in Flutter
There are two ways you can change Android minSdkVersion. The first one is for the projects that are created before Flutter 2.8 update and the second one is for the projects created after the Flutter 2.8 update.
For the Project Created Before Flutter 2.8 Update
Here are the steps to change minSdkVersion in Flutter for the project created before 2.8 update:
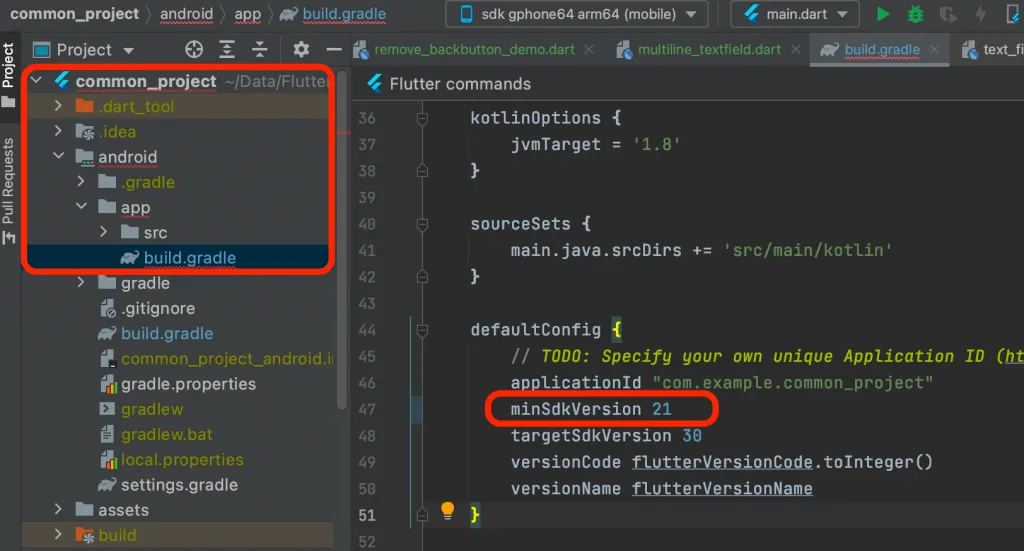
- Locate the
build.gradlefile under theproject_folder/android/app/build.gradle - Find the
defaultConfigsection update theminSdkVersionto the new version. - Inside the terminal, run the
flutter cleancommand. - Re-run your app.
Code Example:
defaultConfig {
    applicationId "com.example.common_project"
    minSdkVersion 21 // <-- SEE HERE
    targetSdkVersion 30
    versionCode flutterVersionCode.toInteger()
    versionName flutterVersionName
}
Screenshot:
For the Projects Created After Flutter 2.8 Update
To change Android minSdkVersion in Flutter for the project created after the 2.8 update, you have to make changes in the local.properties file and then reference the new variable from the local.properties file inside the build.gradle file.
Here are the steps:
- Locate the
local.propertiesfile under theproject_folder/android/local.properties - Inside the local.properties file, add the line as
flutter.minSdkVersion=21 - Now, open the
build.gradlefile under theproject_folder/android/app/build.gradle - Find the
defaultConfigsection update theminSdkVersionto thelocalProperties.getProperty(‘flutter.minSdkVersion’).toInteger(). - Inside the terminal, run the
flutter cleancommand. - Re-run your app.
Code Example:
Under local.properties file
sdk.dir=/Users/pinkeshdarji/Library/Android/sdk
flutter.sdk=/Users/pinkeshdarji/Data/Development/flutter
flutter.buildMode=debug
flutter.versionName=1.0.0
flutter.versionCode=1
flutter.minSdkVersion=20 #new
-----------------------------
Under build.gradle file
defaultConfig {
    // TODO: Specify your own unique Application ID (https://developer.android.com/studio/build/application-id.html).
    applicationId "com.example.sample_project"
    minSdkVersion localProperties.getProperty('flutter.minSdkVersion').toInteger()
    targetSdkVersion flutter.targetSdkVersion
    versionCode flutterVersionCode.toInteger()
    versionName flutterVersionName
}
Screenshot:

If you’re facing issues with Dart SDK configuration in your Flutter project, we’ve got you covered. Check out our blog post on ‘Dart SDK is not Configured in Flutter‘ to learn how to configure it properly.
Conclusion
In this tutorial, we saw how to change Android minSdkVersion (flutter.minsdkversion) in Flutter with practical examples. We explored both ways to change the SDK version in Android for the projects created before and after Flutter 2.8 update.
Would you like to check other interesting Flutter tutorials?
